LEAKY BOOT
SYNDROME
Before anything else check thoroughly for rust holes in both wheel arches. Peel back the boot carpet and shine a bright light around the wheel arch while an assistant looks for light penetration inside the boot. This may help in spotting small holes. Even a tiny hole can allow significant amounts of water to enter the boot. Pay particular attention to the towing eyes that are welded to the wheel arch. Water can penetrate up between the towing eye and the wheel arch and then into the boot area.
The
following chart gives details of points of entry where water may
get into your boot together with some information to assist in
diagnosis and rectification. You can establish most of this with
2 people and water testing just deciding who is the unlucky one
to get wet. Kaz always loses on this one.
POINT OF ENTRY |
PROBLEM |
RECTIFICATION |
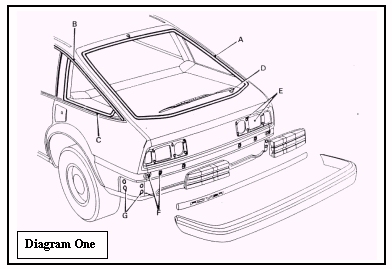
Tailgate Glass seal (A in diagram 1) |
Water passing between seal
& glass or between seal & tailgate |
Reseal using a window
sealer paying particular attention to corners. Check also
that wiper motor is not fouling parcel shelf as this
tends to push screen outwards and break seal on lower
edge. |
Drip Moulding flange (B in diagram 1) |
Crack or pinhole in drip
moulding. Sealant Can allow water to enter and run down
between e posts & drip moulding & emerge below ¼
light seal. Note water entry at this point can be
mistaken for a ¼ light leak |
Reseal flange with sealant
note it may not be necessary to remove chrome strip to
carry out this operation if a suitable tool such as a
small screwdriver is used for the application of the
sealer. |
Quarter light (C in diagram
1) |
Leaking between seal and
body or seal and glass |
Reseal insuring that
quarter light is set correctly in aperture |
Wiper motor (D in diagram 1) |
Water entry passed rubber
grommet in tail gate glass |
Gain entry to grommet and
apply sealant to area and reassemble |
Tail lamps (E in diagram 1) |
Water passing between lamp
and body and entering boot |
Apply sealant around lamp
gasket over lapping on to body and lamp |
Rear motive (F in diagram 1) |
Water entry through holes
for plinth securing bolts |
Ensure grommets are fitted
between plinth and body and apply sealant between
grommets and body |
Rear bumper mountings (G in diagram 1) |
A loose mounting or missing
rubber gasket will allow water to travel along mounting
bolts in to the boot |
Insure rubber gaskets are
fitted apply sealant around bolt heads and tighten bolts |
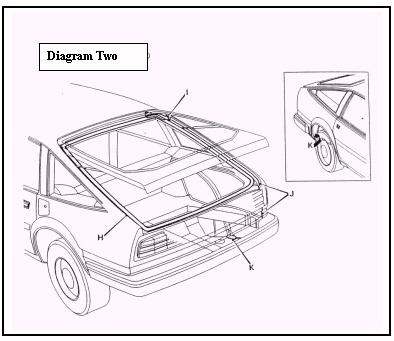
Tailgate seal (H in diagram
2) |
Seal not fitting correctly
on top corners of flange a build up in this area can
cause water to enter seal carrier and travel down the
seal dripping out at lower point |
Dress flanges to ensure
seal fits properly make sure flanges are fully home
ensure that seal is fitted with uppermost lip pointing
outwards |
Wiring sheath between
tailgate and E post left hand and right hand (I in
diagram 2) |
Water passing between
grommet and tailgate aperture and running down inside E
post into boot |
Check for cracks splits in
sheath and ensure grommet is fitted correctly in E post.
If necessary apply sealant between grommet and E post |
Tail gate aperture seams and back panel wing vertical seams (J in diagram 2) |
Water entry through cracks
or pinholes in sealer |
Reseal aperture seams and
back panel wing seams and repaint |
Rear wheel arch (K in
diagram 2) |
Water entry through double
panel joint on rear lower flange |
Seal joints inside boot
adjacent to sunroof drain tube |
Sunroof motor (if fitted) |
Water entry passed motor
fixings in boot floor |
Remove motor and apply
sealant around fixing bolt threads and refit motor |
Tailgate
support struts
|
Water entry passed mounting
struts on tailgate aperture |
Remove nut apply sealant to
both sides of mounting and washer and tighten nuts |
Verify by water testing again.
roversd1mania 1997 - PRESENT